cranksets
Crankset Removal and Installation
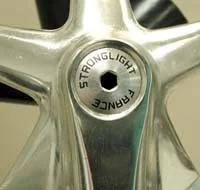
Crank arms are pressed tightly to the bottom bracket spindle. To service the bottom bracket bearings you must remove the crank arms. On most triple chainring cranks the arms must be removed to replace the chainrings. Older Campagnolo and some newer competitior's cranks use "One-key release" systems which do not require a crank puller. A Stronglight one-key system cap is pictured below. Note the collar with four tiny pin holes which holds the 8mm allen center bolt in place. The collar on older Campy cranks used a left hand thread and held in place a 7mm center bolt.

One-Key Crank Release System
Crank Removal Tips for Tapered Spindle Bottom Brackets
Shift your chain to largest chainring so you may protect hands against chainring's sharp teeth.
Look for a bolt, nut or cap at the end of your crank arm in line with bottom bracket spindle. If no bolt is visible, remove the dust caps. Some caps pry out and some thread out. Threaded caps usually have a screwdriver slot or allen head fitting. Pry-out caps usually have a lip on one side that a small screwdriver will fit under.
NOTE: If your bike has a one-key release system as pictured above, leave the collar in place. Simply turn the center bolt counter-clockwise to remove your crank arm for one-key release system.

8mm Crank Arm Allen Bolt
The most common type of crank arm retaining bolt is an 8mm allen head bolt as pictured above. Use a Park HR-8 hex wrench to loosen and remove this bolt.
Threaded crank cap with a 5mm allen slot.
Some cranks use a threded cap to cover the crank arm fixing bolt or nuts underneath. We suggest lightly coating the threads with anti-sieze before installing, if the cover is made of metal. Frozen caps may be removed by drilling a small hole on either side of the center hole and using a pin tool. A punch and light hammer will also work but requires a gentle touch so the crank will not be damaged.


A bolt (male) or nut (female) is under the crank cap.
Turn the bolt or nut head counter-clockwise to remove. Inspect inside the crank arms for washersand remove if present.
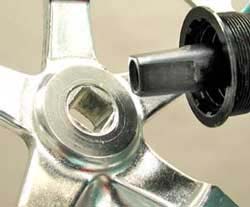
The Park CCP-2 crank arm removal tool consists of two pieces; the arm and threaded driver and the female puller nut.
Turn the female puller nut so it is at the end of the male threaded driver and only resting on 3 to 4 threads.
Now gently thread the puller nut into the crank arm by hand. It should turn 4 to 8 revolutions before it is fully inserted. Be careful not to force the puller nut into the arm so cross threading does not occur.
Tighten the puller nut with an adjustable wrench so it is snugly in place.

Snug the puller nut with an adjustable wrench.
Hold the crank arm firmly and turn the Park CCP-2 driver handle clockwise until your crank comes loose and rests on the bottom bracket spindle. Pull the crank arm from the spindle and unthread both parts of the Park CCP-2 tool from your crank arm. Use extra care so you do not skin your knuckles when removing the tool.

Remove the crank arm by turning the driver clockwise.
Crank Installation Tips for Tapered Spindle Bottom Brackets
Crank arms should be pressed tightly onto a matching, tapered bottom bracket spindle. Note how the square spidle is made with a slight upward sloping taper. The crank square fitting has a matching taper. The crank bolt or nut acts as the pressing tool and forces the arm up the slope of the spindle. The bolt or nut must be tight enough to keep from loosening, but not so tight that the spindle damages the crank. A torque wrench is highly recommended for tightening crank arm bolts.
Tapered crank and bottom bracket interface.
Aluminum crank arms do not require lubrication for a secure fit. Aluminum by its nature is self-lubricating as it is covered with a thin layer of oxidation. Adequate torque is usually enough to keep the crank arms from creaking.
Wipe all sides of the bottom bracket spindle and inside your crank arm mounting holes with a clean rag.
Lightly grease under the head and on the threads of both crank arm fixing bolts or nuts.
Gently slide your right crank arm on to the right side of your bottom bracket spindle.
Thread your crank bolt or nut by hand on to your bottom bracket spindle.
Carefully tighten your crank bolt or nut to the manufacturer's recommended torque.

Use a torque wrench to tighten crank bolts or nuts.
Apply anti-sieze to the threads of your crank cap (if any) and snugly install.
Install your left crank on to the left side of your bottom bracket spindle with arm pointing in the opposite direction of your right side arm.
Carefully tighten your crank bolt or nut to the manufacturer's recommended torque.
Apply anti-sieze to the threads of your crank cap (if any) and snugly install.
Wipe off the crank arms and go for a ride!
Information and photos are courtesy of Park Tool.
Visit their site at ParkTool.Com