Rear Derailleurs
Branford Bike is famous for meticulous Campagnolo ergo lever repair and advice. We now offer the same service for your 2000-current Campagnolo rear derailleur.
We offer a package price for parts and labor of $89, which includes replacing the following genuine Campagnolo springs, from our diagram:

Parts: C and M, we also replace the two o-rings on the pivot bolt, which were designed to take the wear and tear of use--not the bolt. Worn o-rings can contribute to "sloppy" rear derailleur action. These o-rings are manufactured and tested to perfectly replicate the original Campagnolo o-rings.
Additional parts as needed, will incur added expense--we will contact you to confirm any added parts/expense.
Send your 2000+ rear derailleur to:
Branford Bike
2404 10th Ave E
Seattle, WA 98102
USA
Chain Capacity, Cage Length and Chain Wrap
Campagnolo officially recommends various rear derailleur cage lengths for use with specific cassette and double or triple chain ring combinations. However, it is important to understand that any 1999 to 2008, Campagnolo 10 speed rear derailleur, will shift up to a 29 tooth cog and down to an 11 tooth cog. The problem you will run into is that the derailleur cage may not be long enough to take up all the slack in the chain for a wide range. Thus Campagnolo recommends using a short cage derailleur with a maximum cassette cog size of 26 teeth even though it will shift to a 29 tooth cog. Chain wrap or CW is a helpful concept to understand when you need to determine proper derailleur cage length.
Record, Chorus, Centaur and Veloce 9 and 10 speed rear derailleurs use the same three cage lengths; 55, 72.5 and 89 mm measured from the center of the upper jockey wheel to the center of the lower jockey wheel. 55 mm cages have a chain wrap value of 27; 72.5 cages have a CW of 36 while 89mm long cages have a chain wrap value of 39.
Chain Wrap is a simple calculation that will help you determine whether the rear derailleur you choose has a long enough cage to take up the chain slack in your drive train. The shorter the cage, the lighter and stiffer the derailleur and the quicker it will shift. Calculate Chain Wrap to get the greatest shifting performance.
To calculate Chain Wrap Capacity determine the difference between your largest and smallest chain ring. Then determine the difference between your largest and smallest cog. Add the differences and you have Chain Wrap Capacity.
Example: 42/52 chain rings and a 12/21 cassette yields a CW of 19. 52 - 42 = 10. 21 - 12 = 9. 10 + 9 = 19. So, with a 42/52 chain ring and a 12-21 cassette you would need a rear derailleur that has a Chain Wrap Capacity of at least 19.
For a 39/53 and a 13/26 combo you will need a minimum CW of 27. 53-39 = 14. 26 - 13 = 13. 14 + 13 = 27. In practice the CW numbers are flexible by one or two points. You could use a 39/53 with a 12-26 cassette with a CW of 27 even though the calculation calls for 28.
Campagnolo Pre-2001
In 2001 Campagnolo changed the geometry of their 9 speed rear derailleur. Post-2001 Campagnolo 9 or 10 speed rear derailleurs will NOT work with pre-2001 Ergo levers unless you upgrade the internal Ergo Index Gear to a later 9 speed model. If you do upgrade, you will be rewarded with quicker and more precise shifting. 2001 to 2008, 9 speed rear derailleurs, can easily be upgraded to 10 speed by simply replacing the 9 speed pulley wheels with 10 speed ones.
Pre-2001 nine speed rear derailleurs have a "B" adjusting screw located on the derailleur hanger tab next to the frame hanger mounting bolt. The "B" adjusting screw butts against your frame's rear dropout and allows you to adjust the angle of the derailleur body. 2001 to 2008 9 and 10 speed rear derailleurs have the "B" adjusting screw located at the junction of the derailleur body and pulley wheel cage.
Campagnolo Pre-2001 Rear Derailleur
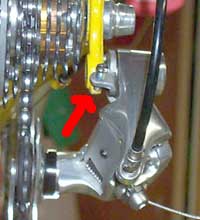
The red arrow points to a "B" adjusting screw that rests on the
frame's dropout. Newer rear derailleurs have the "B" adjusting
screw located on the pulley wheel cage where it joins the rear derailleur body.
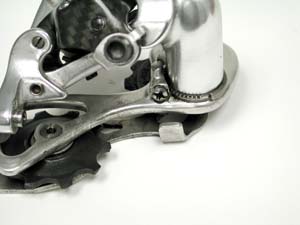
Campagnolo Rear Derailleur Parts
Pre-2009 Campagnolo Rear Derailleur Parts

Pre-2009 Campagnolo Rear Derailleur Parts
Most Campagnolo rear derailleur parts can be interchanged amongst Record, Chorus, Centaur and Veloce rear derailleurs. For available Campagnolo rear derailleur parts, please check here.
Campagnolo Record and Chorus rear derailleur cages are interchangeable. So are 2004 to 2008 Centaur and Veloce rear derailleur cages. However, you may not switch a Centaur cage with a Chorus, nor a Veloce with a Record. Record and Chorus cages bolt to the rear derailleur body while all years Centaur and Veloce cages affix via a small "C" clip.
Pre-2004 Centaur and Veloce rear derailleur cage assemblies used an all metal cage assembly pivot adjusting housing and screw (part L above). 2004 to 2008 Centaur and Veloce rear derailleurs use a black plastic pivot adjusting housing. The two types of pivot assemblies are not interchangeable.
Derailleur jockey wheels wear and eventually require replacement. The teeth will thin and become pointed, especially the lower jockey wheel. Worn jockey wheels will not be able to hold or guide the chain as well as newer ones. Shifting performance will suffer. In the image below, three jockey wheels are shown in progression of wear. Replace your jockey wheels when they look like the middle wheel. Center bushings also wear and create play in the jockey wheel and rear derailleur which further degrades shifting performance.

We suggest using Le Tour Premium Chain Lube for lubricating all Campagnolo rear derailleurs. A drop on each pivot point, jockey wheel bushing and the frame hanger bolt, once a month or after a rain storm, will insure long life and smooth shifting. Always wipe off excess chain lube or accumulated dirt.
We suggest using a Park Torque Wrench, for the most accurate installation. Campagnolo recommends tightening the frame mounting bolt to 15 Newton Meters (N.m) or 11.1 foot pounds. The cable anchor bolt should be tightened to 6 Newton Meters (N.m) or 4.4 foot pounds. Be sure to place the derailleur wire behind or on the spoke side, of the cable anchor bolt. If placed in front of the bolt, the rear derailleur will not index properly.
Genuine Campagnolo replacement parts are available below.
Made in Italy by Campagnolo and backed with a three year warranty.
Warranty service and help with technical questions is available from Campagnolo USA in Carlsbad, California USA. Call Campagnolo USA at (760) 931-0106, visit them at Campagnolo.com by clicking on the underlined text .
Official product manuals and more product information is also available at Campagnolo.com .
Rear Derailleur Adjustment
Derailleur Travel Limit Screws
Rear derailleurs "derail" or shove the chain off of one sprocket and move it to another. The upper derailleur pulley (called the "guide pulley") pushes the chain to the next sprocket. A proper gear adjustment aligns the guide pulley under the sprocket.
Changes to the inner wire tension causes movement in the derailleur. The derailleur body is fitted with a spring that is pulled tight, or relaxed, by the inner wire. Pulling the inner wire moves the derailleur cage and guide pulley in one direction and tightens the spring. Relaxing inner wire tension allows the spring to move the body and pulley in the opposite direction.
It is normal for a chain to make some noise during a shift. The shift may appear subjectively "noisy," "loud," or "rough". Factors like the type of chain or sprocket, the wear on each, and the amount and type of lubrication will affect the noise a chain makes during shifting. The limit screws typically can do nothing to affect the noise during a shift between cogs. Noise from the chain as it rides on the sprocket is, however, a useful symptom. There is for any given bike a "base level" of noise from the chain as it passes over the sprocket teeth. When the derailleur jockey wheel is out of alignment, the chain may make excessive noise. To demonstrate the "base level" noise, shift the bike to the second sprocket by pulling the inner wire. Continue to pedal and move the inner wire slightly to hear changes in the level of noise. The quietest level of noise may be considered the base level for that bike.
Derailleur pulleys are limited in both inward and outward motions by using the derailleur limit screws. Properly set, the derailleur will shift to both the extreme outward sprocket (the smallest in size) and the extreme innermost sprocket (the largest in size). The limit screws do not control the derailleur on the sprockets between the two extremes. These are set using the barrel adjuster and tension on the inner wire. The limit screws are usually marked "H" and "L". The "H" controls the outer most limit of the derailleur, and the "L" controls the inner most limit.
Using the shift lever to adjust limit screws can cause confusion and problems because it tends to focus attention on the inner wire tension (indexing) rather than limit screw settings. Instead of using the shift lever, pull the inner wire with one hand to simulate shift lever action. This will help eliminate confusion between indexing problems and limit screw problems. With the bike in a stand, practice shifting with this method before adjusting the limit screws.

Turning the limit screws adjusts the limit of travel of the pulleys. Tightening restricts the travel, while loosening allows more travel. The purpose of the following procedure is to find the tightest H-limit screw setting that will allow a good shift to the outermost cog, and the tightest L-screw setting that will allow a good shift to the innermost cog. The location of limit screws on the derailleur body may vary between manufacturers. Always look for the "H" and "L" marked adjacent to the screws.
H Limit Screw
Shift chain to outermost (largest) chain ring. Shift chain to outermost rear sprocket (smallest sprocket).
Check tension on rear inner wire. If inner wire appears to have any tension, it may interfere with the H-screw setting. Turn adjusting-barrel clockwise to eliminate inner wire tension. Proper cable tension (indexing) will be adjusted later.
Pedal bike at a quick cadence, approximately 60 rpm or more.
Pull inner wire to shift derailleur one sprocket inward. Adjust pull on inner wire until chain rides quietly on second sprocket. Release inner wire quickly to shift back to outermost sprocket and note shift. When adjusting the H-screw, be concerned with two situations:
The outward shift from the second sprocket to the outermost sprocket.
How the chain rides on the outermost sprocket.
Do not be concerned with how the chain rides when it is held on the second sprocket.
If the shift outward seems acceptable, tighten H-screw 1/4 turn clockwise and repeat shift. Even if shift appears acceptable, continue tightening H-screw by 1/4 turn increments and checking shift until shifting is slow or hesitant. Another symptom of a too tight H-limit screw is when the chain is on the smallest cog but makes a rattle from rubbing the second sprocket inward. View this last symptom by looking under the rear sprockets where the chain meets the sprockets. The inner plate of the chain will rub against the next sprocket inward making the noise.

When symptoms of a too tight H-screw appear, loosen H-screw 1/4 turn and check shift again. Repeat process of shifting and correcting by 1/4 turn increments. When too tight symptoms disappear, H-screw is at tightest acceptable setting, and limit screw setting is done.
NOTE: "Rapid Rise" or "Low-Normal" derailleurs use a reverse spring application. When the inner wire tension is completely relaxed, the derailleur sits on the inner most sprocket, which is reversed from other common derailleurs. When adjusting the H-limit screw, it is necessary to pull the inner wire until the chain is in the second to outermost sprocket then pull hard to shift to the outermost sprocket. The same concept is used to adjust the Shimano® "Rapid-Rise" or "Low-Normal" derailleurs. You want the tightest limit screw setting that allows good shifting to the extreme outer and inner cogs.
L Limit Screw
The L-limit stops the derailleur from moving inward (toward the spokes). The limit screw does not make the derailleur move, pulling the inner wire makes the derailleur move. The L-screw allows the pulley wheels to shift the chain to the innermost sprocket and yet not shift off the sprocket into the spokes.
Shift bike to middle chain ring (or smaller ring of double chain ring bikes) and to second-to-innermost rear sprocket.
Pedal bike at a quick cadence, approximately 60 rpm or more.
Pull inner wire by hand to shift derailleur sprocket inward. When adjusting the L-screw, be concerned with two situations:
The inward shift from the second-to-innermost sprocket to the innermost sprocket.
How the chain rides on the innermost sprocket.
If shifting seems adequate, tighten L-screw 1/4 turn, and repeat shift. Continue to tighten L-screw until symptoms of too tight appear. These symptoms are that the chain will not complete shift even with pressure on inner wire, the chain hesitates before shifting inward even with constant pressure on inner wire, or the chain rattles excessively when riding on innermost sprocket.

When symptoms of a too tight L-screw appear, loosen L-screw 1/4 turn and check shift again. Repeat process of shifting and correcting by 1/4 turns. When too tight symptoms disappear, L-screw is at tightest acceptable setting, and limit screw setting is done.
B Screw Adjustment
After setting the L-screw, check the "B-screw" for an adequate setting. The B-screw controls the derailleur body angle, hence the name, B-screw. Shift to the innermost rear cog, which is the largest cog. View the upper pulley relative to the largest cog. If the pulley is rubbing against this cog, tighten the B-screw to increase upper pivot spring tension, which pulls the pulley back and away from the cog. If there is a large gap between the upper pulley and cog, loosen the screw. Check for rubbing of largest sprocket and upper pulley. Adjust B-screw as necessary.
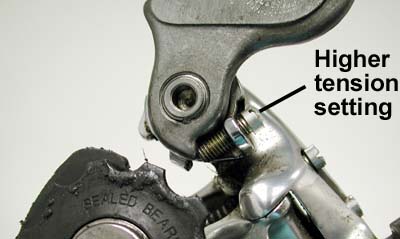

Campagnolo®
Newer, post 2001, Campagnolo rear derailleurs have a body tension adjustment at the pulley cage, not at the upper pivot. The screw is basically a "rack and pinonquot; system. The cage spring plate rotates to increase or decrease tension. The upper pivot and lower cage pivot springs oppose one another. In this system, the upper spring is fixed. Increasing cage tension (turning screw clockwise) will bring the upper pulley closer to the cog. Decreasing cage tension (turning screw counter-clockwise) will increase the distance between upper pulley and cog.
Rear Derailleur Index Adjustment
The rear indexing adjustment should only be done after the H-limit and L-limit screws are adjusted. The rear derailleur indexing is adjusted by changing the inner wire tension. For the common rear derailleurs, increasing inner wire tension tends to move the rear derailleur more to the left, or toward the spokes. Less inner wire tension tends to move the derailleur to the right. The inner wire tension will not stop the derailleur at its extreme limits. The H-limit screw stops the derailleur at its right most setting, and the L-limit screw stops the derailleur at its left most setting.
Modern indexing shift levers use dwell, which is a hesitation between movements in the lever. These hesitations are timed to match the movements of the derailleur and the spacing in the rear sprockets. The design of some derailleur and shift lever brands requires more of a push (or twist) of the lever to complete the shift. The amount of extra push or twist is not consistent between manufacturers and each rider must learn the particular attributes of his or her system.
Changes to inner wire tension are made at the adjusting barrel. Adjusting barrels may be located either at the rear derailleur or at the shift lever. The goal of adjusting the indexing is to find the tightest inner wire tension setting that will allow good shifting to the gears normally used. This will allow the longest lasting indexing adjustment as the system wears and the cable system stretches with use. To find the tightest inner wire setting, you will purposely make the setting too tight then relax tension slightly. There are two basic symptoms for a "too tight" inner wire. These are a rattling noise from the chain rubbing against the next cog inward, and a slow or hesitant outward shift. These are symptoms for rear derailleurs that sit outward when inner wire tension is released.
NOTE: If the cable inner wire is not correctly routed into the derailleur pinch bolt, a good indexing setting may not be possible. The wire should leave the barrel adjuster and travel straight to the pinch mechanism. The upper image is correctly routed, while the lower image shows incorrect routing.

Index Setting
Set limit screws (if not already done).
Shift chain to outermost rear sprocket (smallest). Shift chain to outermost (largest) chain ring in front.
Test initial inner wire tension. Pedal a normal cadence and shift rear derailleur with one click on lever. Use care to only move lever one position. If derailleur moves one sprocket, tension is adequate.
If derailleur fails to shift one sprocket, inner wire may be too slack. Turn barrel adjuster fully into derailleur body (or shift lever) then turn counter clockwise two turns to allow for index adjustments. Loosen inner wire pinch bolt and gently pull on inner wire with fourth hand tool or pliers to remove slack. Tighten inner wire pinch bolt.
If derailleur will not shift one sprocket after removing slack in "d", return lever back to outermost sprocket position and increase inner wire tension by turning barrel adjuster counter-clockwise 1/4 turn and attempt shift again.
Shift to second sprocket in rear. Pedal and increase inner wire tension by continuing to turn adjusting barrel counter-clockwise until a definite rattling is heard. Rattle is from chain scrapping against next sprocket.
Once a too-tight rattle is achieved, turn barrel adjuster 1/4 turn clockwise, to release inner wire tension, and pedal again. Listen and look for signs of scraping or rattling. Continue turning barrel adjuster 1/4 turn clockwise at a time until rattle disappears.
Shift derailleur one sprocket inward at a time, listening for signs of rattle, indicating a too tight inner wire. Turn adjusting barrel 1/4 turn clockwise to eliminate rattle. Note: Do not attempt shift to largest rear sprocket while in largest front sprocket. This gear is normally not used and adjusting tension to this shift may compromise other commonly used gears.
Shift to innermost (smallest) chain ring and check gears again. If no rattling is present, index adjustment is done.
Note: The indexing procedure here assumes that there are no unusual problems, such as bent derailleurs, bent derailleur hangers or excess inner wire friction from dirt in the housing. Additionally, manufacturers design shift levers and drive train components to work within their system. Mixing brands within the drive train may lead to poor shifting. This is referred to as an compatibility problem.
Information and photos are courtesy of Park Tool.
Visit their site at ParkTool.Com